ChatGLM3 终于带来了跟 ChatGPT 一样的工具调用能力,通过它的源码和样本数据,我们可以了解到让大模型学会使用工具的方法原理。
官方例子中的疑问
我们先跟着官方例子的步骤一步步走。
构建 System Prompt
这里以两个工具调用为例,首先准备好要构建的数据的描述信息。其实就是定义好我们能给大模型提供的工具。
tools = [
    {
        "name": "track",
        "description": "追踪指定股票的实时价格",
        "parameters": {
            "type": "object",
            "properties": {
                "symbol": {
                    "description": "需要追踪的股票代码"
                }
            },
            "required": ['symbol']
        }
    },
    {
        "name": "text-to-speech",
        "description": "将文本转换为语音",
        "parameters": {
            "type": "object",
            "properties": {
                "text": {
                    "description": "需要转换成语音的文本"
                },
                "voice": {
                    "description": "要使用的语音类型(男声、女声等)"
                },
                "speed": {
                    "description": "语音的速度(快、中等、慢等)"
                }
            },
            "required": ['text']
        }
    }
]
system_info = {"role": "system", "content": "Answer the following questions as best as you can. You have access to the following tools:", "tools": tools}
提出问题
注意:目前 ChatGLM3-6B 的工具调用只支持通过 chat 方法,不支持 stream_chat 方法。具体原因后面分析源码的时候会说。
history = [system_info]
query = "帮我查询股票 10111 的价格"
response, history = model.chat(tokenizer, query, history=history)
print(response, history)
这里得到的输出为
response: {'name': 'track', 'parameters': {'symbol': '10111'}}
history: [{'role': 'system', 'content': 'Answer the following questions as best as you can. You have access to the following tools:', 'tools': [{'name': 'track', 'description': '追踪指定股票的实时价格', 'parameters': {'type': 'object', 'properties': {'symbol': {'description': '需要追踪的股票代码'}}, 'required': ['symbol']}}, {'name': 'text-to-speech', 'description': '将文本转换为语音', 'parameters': {'type': 'object', 'properties': {'text': {'description': '需要转换成语音的文本'}, 'voice': {'description': '要使用的语音类型(男声、女声等)'}, 'speed': {'description': '语音的速度(快、中等、慢等)'}}, 'required': ['text']}}]}, {'role': 'user', 'content': '帮我查询股票 10111 的价格'}, {'role': 'assistant', 'metadata': 'track', 'content': " ```python\ntool_call(symbol='10111')\n```"}]response的返回结果是一个dict对象,这表示模型需要调用工具 track,并且需要传入参数 symbol。
注意看history中的最后一个结果是:
{'role': 'assistant', 'metadata': 'track', 'content': " ```python\ntool_call(symbol='10111')\n```"}这其实很奇怪,之前版本的ChatGLM的最后一个history的content都是跟response一样的结果,但是在这个回答结果中却不一样了,而且还多了一个字段:'metadata': 'track'。
调用工具,生成回复
这里需要自行实现调用工具的逻辑,我定义了一个track方法来mock返回的结果。假设已经得到了返回结果,将结果以 json 格式返回给模型并得到回复。
import json
def track(input):
    return json.dumps({"price": 12412}, ensure_ascii=False)
result = track(response)
response, history = model.chat(tokenizer, result, history=history, role="observation")
print(response)
这里 role="observation" 表示输入的是工具调用的返回值而不是用户输入,不能省略。
期望得到的输出为
根据您的查询,经过 API 的调用,股票 10111 的价格是 12412。这表示本次工具调用已经结束,模型根据返回结果生成回复。对于比较复杂的问题,模型可能需要进行多次工具调用。这时,可以根据返回的 response 是 str 还是 dict 来判断返回的是生成的回复还是工具调用请求。到这里我们前面的疑问基本得到解答,对于工具调用来说,response 是调用函数的参数,是经过特殊处理的。但是我们都知道,大模型只能生成文本,返回结果出现了dict 对象一定是有trick在里面的。
工具调用的原理
为了进一步了解背后的原理,我们需要了解更多的信息,首先就是要看ChatGLM3的训练工具调用的样本数据是如何构造的。
<|system|>
Answer the following questions as best as you can. You have access to the following tools:
[
    {
        "name": "get_current_weather",
        "description": "Get the current weather in a given location",
        "parameters": {
            "type": "object",
            "properties": {
                "location": {
                    "type": "string",
                    "description": "The city and state, e.g. San Francisco, CA",
                },
                "unit": {"type": "string"},
            },
            "required": ["location"],
        },
    }
]
<|user|>
今天北京的天气怎么样?
<|assistant|>
好的,让我们来查看今天的天气
<|assistant|>get_current_weather
```python
tool_call(location="beijing", unit="celsius")
```
<|observation|>
{"temperature": 22}
<|assistant|>
根据查询结果,今天北京的气温为 22 摄氏度。
上面就是工具调用的训练样本示例,可以看到,原始的训练样本中,当需要调用工具的时候,返回的结果是
<|assistant|>get_current_weather
```python
tool_call(location="beijing", unit="celsius")
```
从工具调用的样本数据来看,ChatGLM3的工具调用规范分为两部分:
- 第一行是需要调用的函数,如上面例子中的
get_current_weather - 第二行是代码,固定写死了调用
tool_call,参数部分location="beijing", unit="celsius"是大模型可以自由发挥的地方。
上面的天气例子跟我们在上面官方例子格式中是一致的,只不过变成了dict对象。metadata是函数名称,content是代码。这里大模型根据上下文推测出了参数是symbol='10111'。
{'role': 'assistant', 'metadata': 'track', 'content': " ```python\ntool_call(symbol='10111')\n```"}正常来说,大模型返回什么,response的结果就应该是什么,但我们拿到的response为什么变成了:
{'name': 'track', 'parameters': {'symbol': '10111'}}要解答这个问题,我们就需要看ChatGLM3的推理源码:https://modelscope.cn/models/ZhipuAI/chatglm3-6b/file/view/master/modeling_chatglm.py
def chat(self, tokenizer, query: str, history: List[Tuple[str, str]] = None, role: str = "user",
         max_length: int = 8192, num_beams=1, do_sample=True, top_p=0.8, temperature=0.8, logits_processor=None,
         **kwargs):
    if history is None:
        history = []
    if logits_processor is None:
        logits_processor = LogitsProcessorList()
    logits_processor.append(InvalidScoreLogitsProcessor())
    gen_kwargs = {"max_length": max_length, "num_beams": num_beams, "do_sample": do_sample, "top_p": top_p,
                  "temperature": temperature, "logits_processor": logits_processor, **kwargs}
    inputs = tokenizer.build_chat_input(query, history=history, role=role)
    inputs = inputs.to(self.device)
    eos_token_id = [tokenizer.eos_token_id, tokenizer.get_command("<|user|>"),
                    tokenizer.get_command("<|observation|>")]
    outputs = self.generate(**inputs, **gen_kwargs, eos_token_id=eos_token_id)
    outputs = outputs.tolist()[0][len(inputs["input_ids"][0]):-1]
    response = tokenizer.decode(outputs)
    history.append({"role": role, "content": query})
    response, history = self.process_response(response, history)
return response, history首先看一下chat的实现,这里我们注意到response, history在返回之前是被处理过的。
response, history = self.process_response(response, history)
所以我们继续看process_response的代码实现:
def process_response(self, output, history):
    content = ""
    history = deepcopy(history)
    for response in output.split("<|assistant|>"):
        metadata, content = response.split("\n", maxsplit=1)
        if not metadata.strip():
            content = content.strip()
            history.append({"role": "assistant", "metadata": metadata, "content": content})
            content = content.replace("[[训练时间]]", "2023 年")
        else:
            history.append({"role": "assistant", "metadata": metadata, "content": content})
            if history[0]["role"] == "system" and "tools" in history[0]:
                content = "\n".join(content.split("\n")[1:-1])

                def tool_call(**kwargs):
                    return kwargs

                parameters = eval(content)
                content = {"name": metadata.strip(), "parameters": parameters}
            else:
                content = {"name": metadata.strip(), "content": content}
    return content, history
注意这段代码:
if history[0]["role"] == "system" and "tools" in history[0]:
还记得工具调用之前要声明一下system_info 和tools吗?这里就是判断了一下我们是不是用了工具调用。如果是就会进一步处理:
# 示例:此时 content="" ```python\ntool_call(symbol='10111')\n```"
content = "\n".join(content.split("\n")[1:-1])
def tool_call(**kwargs):
    return kwargs
parameters = eval(content)
content = {"name": metadata.strip(), "parameters": parameters}
上面的代码主要做了:
- 提取待执行的代码:将
content="```python\ntool_call(symbol='10111')\n```"转化为content="tool_call(symbol='10111')" - 定义
tool_call函数,其实就是返回dict格式的入参。 eval()函数用于执行一个字符串表达式,并返回表达式的值。例如,eval("1 + 2")返回3。在我们这个例子中其实就是执行tool_call(symbol='10111'),返回结果就是:{'symbol': '10111'}- 拼接最后的返回结果,即
{'name': 'track', 'parameters': {'symbol': '10111'}}注意这里的name是中metadata中获取的,其实就是tool的名称,由大模型预测的output中的第一行。
根据上面的分析,我们知道了为什么工具调用样本中要写死调用tool_call,因为要通过它将模型推理的入参转换为dict对象。
为了方便读者理解,我这里提供示例代码,有不理解的地方可以断点调试。
def process_response(output, history):
    content = ""
    for response in output.split("<|assistant|>"):
        metadata, content = response.split("\n", maxsplit=1)
        if not metadata.strip():
            content = content.strip()
            history.append({"role": "assistant", "metadata": metadata, "content": content})
            content = content.replace("[[训练时间]]", "2023年")
        else:
            history.append({"role": "assistant", "metadata": metadata, "content": content})
            if history[0]["role"] == "system" and "tools" in history[0]:
                content = "\n".join(content.split("\n")[1:-1])

                def tool_call(**kwargs):
                    return kwargs

                parameters = eval(content)
                content = {"name": metadata.strip(), "parameters": parameters}
            else:
                content = {"name": metadata.strip(), "content": content}
    return content, history

#大模型预测的结果
output = """track
```python
tool_call(symbol='10111')
```"""
history = [{'role': 'system', 'content': 'Answer the following questions as best as you can. You have access to the following tools:', 'tools': [{'name': 'track', 'description': '追踪指定股票的实时价格', 'parameters': {'type': 'object', 'properties': {'symbol': {'description': '需要追踪的股票代码'}}, 'required': ['symbol']}}, {'name': 'text-to-speech', 'description': '将文本转换为语音', 'parameters': {'type': 'object', 'properties': {'text': {'description': '需要转换成语音的文本'}, 'voice': {'description': '要使用的语音类型(男声、女声等)'}, 'speed': {'description': '语音的速度(快、中等、慢等)'}}, 'required': ['text']}}]}, {'role': 'user', 'content': '帮我查询股票10111的价格'}]

process_response(output, history)
最后再解释一下为什么 ChatGLM3-6B 的工具调用只支持通过 chat 方法,不支持 stream_chat 方法。从源码上面看,stream_chat 没有调用process_response方法,自然就没法返回处理过的工具调用结果。这只是表面原因,进一步思考你就会发现,根本原因是stream_chat 是一个个吐字的,没法中间做手脚将工具调用结果进行处理。
执行过程示例
第一次调用大模型
prompt 入参
<|system|>
Answer the following questions as best as you can. You have access to the following tools:
[
    {
        "name": "get_current_weather",
        "description": "Get the current weather in a given location",
        "parameters": {
            "type": "object",
            "properties": {
                "location": {
                    "type": "string",
                    "description": "The city and state, e.g. San Francisco, CA",
                },
                "unit": {"type": "string"},
            },
            "required": ["location"],
        },
    }
]
<|user|>
今天北京的天气怎么样?
大模型 response
<|assistant|>
好的,让我们来查看今天的天气
<|assistant|>get_current_weather
```python
tool_call(location="beijing", unit="celsius")

此次发现大模型需要调用函数,于是系统调用了天气函数,得到结果

```Java
<|observation|>
{"temperature": 22}
第二次调用大模型
prompt 入参
将函数结果放进 prompt 中,让大模型根据完整的对话历史给出回答。
<|system|>
Answer the following questions as best as you can. You have access to the following tools:
[
    {
        "name": "get_current_weather",
        "description": "Get the current weather in a given location",
        "parameters": {
            "type": "object",
            "properties": {
                "location": {
                    "type": "string",
                    "description": "The city and state, e.g. San Francisco, CA",
                },
                "unit": {"type": "string"},
            },
            "required": ["location"],
        },
    }
]
<|user|>
今天北京的天气怎么样?
<|assistant|>
好的,让我们来查看今天的天气
<|assistant|>get_current_weather
```python
tool_call(location="beijing", unit="celsius")
<|observation|> {“temperature”: 22}
#### 大模型 response

```Java
<|assistant|>
根据查询结果,今天北京的气温为 22 摄氏度。
总结
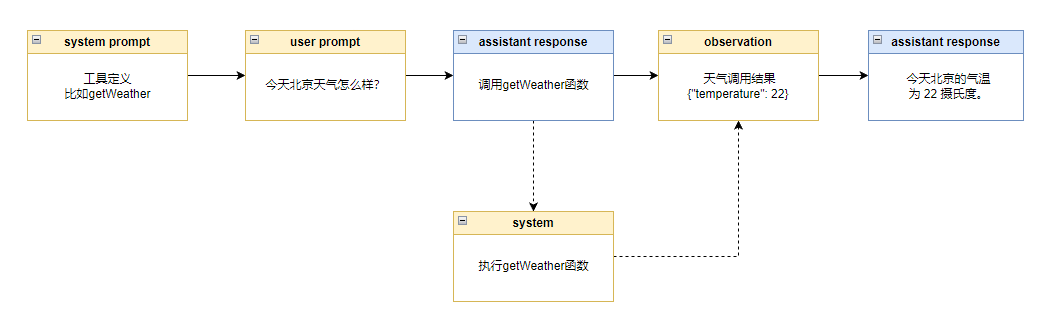
大模型调用工具的本质就是让大模型通过微调学会根据 prompt 中的函数的定义学会下一步应该调用哪个函数,然后我们解析大模型预测的文本结果去执行对应的函数,最后再把执行的结果拼接到 prompt 中,让大模型继续预测后续的步骤。
主要的步骤有 6 步:
- 定义工具
- 用户提出问题
- 大模型根据工具和用户问题预测是否需要使用工具,如果需要就预测出要调用哪个工具及其入参
- 系统发现大模型预测要使用工具,就调用对应的函数
- 系统将调用结果拼接到 prompt 中
- 大模型根据函数调用结果回答用户问题